Sourcing
Printed Parts
GaggiMate 3D printed parts: Download essential STL files for display housings and controller enclosures.
GaggiMate requires a handful of printed parts to function. You will need to either print these yourself or buy them in the shop. You will probably also be able to find a place locally to make these for you.
It is recommended not to use PLA for these as it has a low melting point and might easily break when printing flexible tabs. You can use materials like PETG, ABS, ASA.
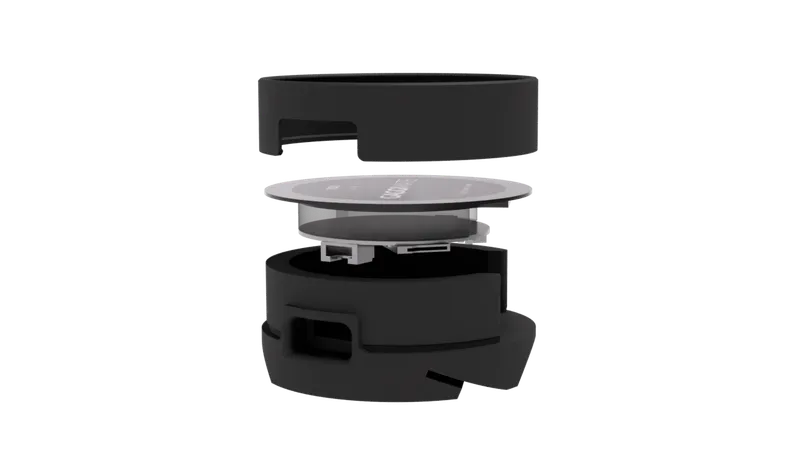
All routes - Display housing
BOM
- stls/display/case_front.stl (Github) (Print 2 if unsure about sturdyness of the print)
- stls/display/case_back_* (Github) (Choose the correct back part for your machine)
- LilyGo T-RGB (See other sourcing pages)
Assembly
Sit the screen inside of the case back and align the connectors correctly. Now carefully push the case front down onto the screen until it clicks into place. This will bend the tabs outside along the layerlines so be careful not to break them.
Variant: Magnetic display housing

BOM
- stls/display/case_front.stl (Github) (Print 2 if unsure about sturdyness of the print)
- stls/display/Alternative backplate (Github)
- 4 pcs 6x3mm Neodymium Magnet N52 (AliExpress) (Ignore this if you want to screw down the display)
- LilyGo T-RGB (See other sourcing pages)
Assembly
Push the magnets into the 4 holes if you’re going for a magnetic install, otherwise drill holes into your machine and screw it down with the provided screw holes. The magnets should hold by themselves, if they’re a bit loose you can use a dab of superglue.
Sit the screen inside of the case back and align the connectors correctly. Now carefully push the case front down onto the screen until it clicks into place. This will bend the tabs outside along the layerlines so be careful not to break them.
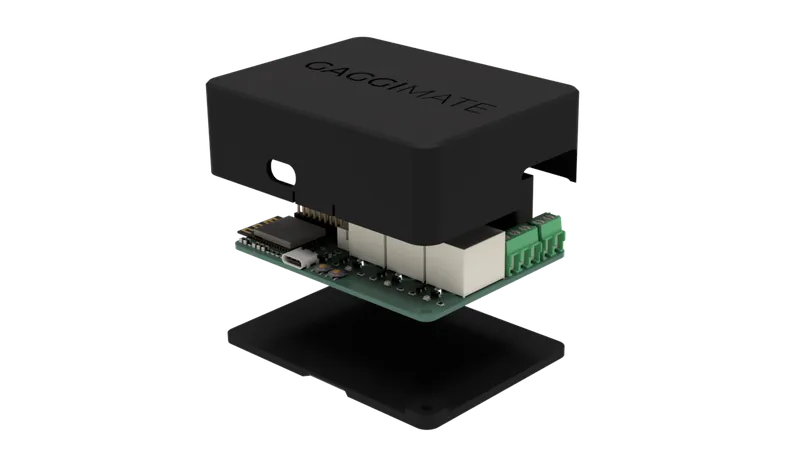
PCB Route - PCB Casing
Assembly
Sit the PCB on top of the case bottom and align the mounting holes correctly. Now carefully push the cover down onto the base until it clicks into place. This will bend the tabs outside along the layerlines so be careful not to break them.
GaggiMate Pro Rev 1.0
BOM
- stls/pcb/gaggimate-pro-rev1/pcb_base_clipped.stl (Github)
- stls/pcb/gaggimate-pro-rev1/pcb_cover_clipped_[support].stl (Github) (Print 2 if unsure about sturdyness of the print)
- GaggiMate Pro PCB Rev 1.0 (See other sourcing pages)
- Double sided tape (VHB or similar)
GaggiMate Standard Rev 2.0
BOM
- stls/pcb/gaggimate-standard-rev2/pcb_base_clipped.stl (Github)
- stls/pcb/gaggimate-standard-rev2/pcb_cover_clipped_[support].stl (Github) (Print 2 if unsure about sturdyness of the print)
- GaggiMate Standard PCB Rev 1.0 (See other sourcing pages)
- Double sided tape (VHB or similar)
GaggiMate Standard Rev 1.0 (Group Buy 2024)
BOM
- stls/pcb/gaggimate-standard-rev1/pcb_clipped_base.stl (Github)
- stls/pcb/gaggimate-standard-rev1/pcb_clipped_cover.stl (Github) (Print 2 if unsure about sturdyness of the print)
- GaggiMate Controller PCB (See other sourcing pages)
- Double sided tape (VHB or similar)
Lego Route - Lego Casing
This is currently work in progress.
Have questions?
Still have questions? Join the Discord!